
Making Custom Dollar Tree Door Mats with the Cricut is an inexpensive, simple way to spruce up your front door. I love a good coir doormat, but sometimes, working on a budget the local dollar tree comes in super handy!
As a crafter, the dollar tree store is a great way to create amazing home decor on a budget.

What Other Dollar Tree Projects Can I Make With My Cricut Besides Floor mats?
- a tiered tray
- rope basket
- beach house decor
- trendy decorative lanterns
- etching glass vases
- contact paper to use as transfer tape
- picture frames
- mason jars
- candle holders
The dollar tree is a great place to find lots of the same things that you would find at the craft store at a fraction of the price. You can also get mod podge, sometimes glue guns, and the doormat I used to make this funny welcome mat.
These welcome mats would also make amazing housewarming gifts for someone who has a ton of kids, and a sense of humor.
I have been using My Cricut Maker to create all sorts of home decor, from Door Mats to Vanity Trays.
Custom Dollar Tree Door Mats

Above all, this funny doormat Is a great dollar store DIY. In short, you don’t need very many things to complete this project most of them you will find laying around the house. Just the doormat, vinyl spray paint, and a few other things.
Dollar store crafts have become super popular in the last few years. I can certainly be in there for hours finding dollar tree crafts, luckily everything is only $1.

What you need to make this funny doormat:
- dollar tree mat you can find them here
- Outdoor paint
- a pair of scissors
- Cricut adhesive vinyl (I used permanent vinyl)
- Transfer tape
- Scraper
- Paintbrush
- A blow dryer or heat gun
- Painters tape
- and the free cut files, grab them below

Above all, this dollar tree DIY Funny doormat is that you can make it say whatever you want to fit your personality. I have a few other doormats too, check them out to get some more ideas or to grab the free files.
Funny Doormat Ideas
- How To Make a DIY Doormat Using Flex Seal with Free SVG
- Cricut Doormat Stencil Using Flex Seal
- Cricut Halloween Doormat
- Easy Fall Doormat with Free SVG
- How To Make A Custom Welcome Mat Using Your Cricut
- How To Make A Coir Mat Using Flex Seal Colors
There are so many funny doormat ideas. There is even more if you check out Pinterest.
In our family we are kind of smarty-pants. So we like a lot of snarky remarks and things that are funny. And we like for people to be able to see just what type of family we are before they enter our home.
But, this funny doormat will definitely be a talking piece anytime you have guests or parties.
What things can I get at the Dollar Tree to DIY with my Cricut?
The dollar tree has so many things that you can use to DIY with your Cricut just like these doormats. Be on the lookout for coffee mugs, photo frames, serving trays, oven mitts and so many more things you can use for Cricut Projects.

Grab the free SVG!
Go to file #72 in the free resource library.
Where can I send the resource library files?
While you’re here, check this out too.
- Heat Transfer Vinyl: How To Remove HTV With Iron
- DIY Vanity Tray and Ring Dish Using Cricut Vinyl and Epoxy
- How To Etch Glass With The Cricut

How To Make A Custom Dollar Tree Door Mats + Free SVG
Make your own custom dollar tree door mats with a little paint and your Cricut. These mats make a great gift or inexpensive home decor!
Materials
- Dollar Tree Doormat
- Permanent adhesive vinyl or Cricut stencil vinyl
- Transfer Tape
- White paint, outdoor paint
- Masking tape
- stencil paintbrush
- Heat Gun or Blow Dryer
Instructions
- Gather all of your supplies. And measure the mat. Measure 1-2 inches smaller.

- Cut a stencil with your Cricut machine that matches the size of your doormat. Weed in reverse and apply transfer Tape to your stencil (I like to use a piece that has been previously used so it comes off easily.

- If needed cut the stencil to fit your mat.

- Apply the vinyl onto the mat and carefully pull off the transfer paper leaving your custom stencil behind on the mat.
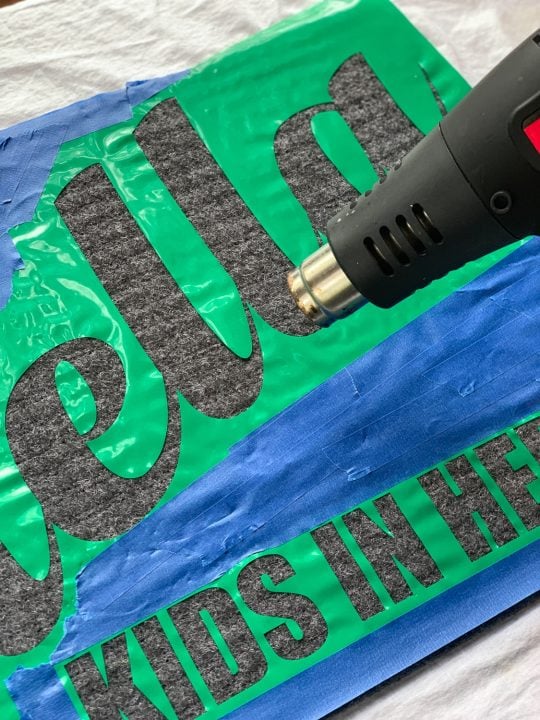
- Use the masking tape to tape down the design to the floor mat. Using a blow dryer or heat gun, heat the vinyl so that it sort of melts tight.
- Apply paint by dabbing with your brush, I sprayed a light coat of white spray paint to prime a bit.
- Remove the vinyl stencil as soon as you are done painting and touch up any areas that may need more paint. Allow the paint to dry before using it.


Recommended Products
As an Amazon Associate and member of other affiliate programs, I earn from qualifying purchases.


